Showing posts with label CRM. Show all posts

Wednesday, August 22, 2018

Microsoft Dynamics 365 Workflows: Keeping Track of Your Processes

This post on CRMUG inspired me to document how we manage Workflow documention in our organization. This is still a manual process and needs to be a priority to keep everything up to date. When first starting the documentation process, it can take a good amount of time to build up the documentation for your existing processes. Then you can plan documentation up-keep into your release processes.

Keep in mind, there is also a description field and notes capabilities on the Process entity. So it is wise to keep at least high-level details of your processes here. Then you can view everything right in CRM without needing too must supplemental documentation.

Advanced Find
We start by creating an Advanced Find of all Activated Processes. You can edit the columns of this view to add the trigger information, primary entity and scope. This is a great start for your documentation. It allows you to review the details and sort/filter to look for issues. For example, you could look for all processes that run on create of the same entity.

Export this find to keep outside of CRM. You can add additional columns to your Excel version to track additional details like parent workflows that call the child workflows or more description information.

On each release, use your saved view for workflows modified since your last review.

Steps to build your Advanced Find:
  1. Go to Advanced Find
  2. Navigate to Look For: Processes, Use Saved View: Activated Processes
  3. Click on “Edit Columns” 
  4. Click “Add Columns”
  5. Select additional columns and click OK. Suggested columns: Primary entity, Business Process Type, Delete Job on Completion, Description (if you are capturing when process is created), Is Child Process, Run as On Demand, Run as User, Scope, Trigger on Create, Trigger on Delete, Trigger on Update Attribute list (lists out all the attributes where the workflow is watching for modifications)
  6. Click “Results”
  7. Export list and review in Excel

Flow Charts
In addition to the Excel documentation, we keep more detailed Flow Charts for complex workflows. These are built in Visio to show all the logic in these workflows. In a perfect world, this documentation would be written prior to the workflow. This gives you a tool for the business to approve and also tracking for your documentation. 

Auditing
Another internal CRM feature that can assist with processes is Auditing. You can turn on Auditing for the process entity and any fields within it just like any other entity. This gives you a way to review recent changes to the process. We turn this on for scope, owner, activation status, etc. This allows us to check when was this workflow turned on, did it start running as someone else and such.

That's it! What other tips do you have for keeping track of your processes?

Friday, June 22, 2018

Microsoft Dynamics 365 Upgrade from 8.1 to 8.2.2

Recently my organization upgraded our 8.1 on-premise instance of Dynamics 365/CRM to version 8.2.2. This went very successfully and we had no major issues when testing or on go-live. The front-end changes are minimal so users were able to use the new version without needing re-training.

However, there were a few things that popped up and surprised us post upgrade:

  • Call Direction: There is a slight change to the out-of-the-box logic when changing the "Direction" on a Phone Call. We have some custom scripting that sets the "Attendees" field. Since this field had 2 Attendees populated, when you change the Direction from Outgoing to Incoming it presents a warning message. If you proceed, then it will update both the Sender and Attendees field.
    • Takeaway: be sure to test minor features when you upgrade such as changing the direction of a call.
    • Resolution: We found that the message only occurs when clicking the OOB field (not when changing through workflows or business rules). So we created a custom "Direction" field then used a Business Rule to set and hide the OOB field as the Custom field changed.

  • Advanced Find Column Focus: We love Advanced Find! So we have lots of views with lots of columns. On version 8.1, if you scrolled right in a view and then selected a line item, the view automatically scrolled to the far left (1st column). On version 8.2.2, we noticed that on some views it was scrolling to the right instead. Turns out it was scrolling to the Primary Field for that entity. 
    • Resolution: The solution was to move the Primary Field to the left so users did not notice the change in behavior. This example was on the Opportunity entity where we had the "Topic" field further to the right so when a user viewed their opportunity and tried to select one it was "jumping". Problem solved with some simple System View updates!

  • Workflow Ownership: When we first upgraded to 2016 (8.1 from 2011) we loved the new feature that you could import workflows without reassigning to yourself then back to your system user account. However, after upgrading to 8.2.2 this appears to not be working exactly as advertised. When importing an existing workflow assigned to another user, the import proceeds successfully. Workflow remains active and assigned to that user. However future system jobs are assigned to the importing user (as if they were the workflow owner). 
    • Resolution: To fix you will need to reassign those workflows back to the owner you want.
    • I have seen this community post for a similar issue but I do not see any Microsoft fixes yet.

  • OOB Business Process Flows and Business Rules: There are some new Business Process Flows and Business Rules added. If you are not using these, make sure you disable. I did notice that the Business Process Flows were active but did not have an Active Process ID. I suspect (but have not confirmed) that they have dependencies to other OOB Process Flows that we had already deleted. So remember to check all the Active processes and see what you actually want to use.
    • Resolution: Review and deactivate as necessary.

  • Split Server Roles: The last gotcha in our upgrade is a bit past my technical depth but the synopsis is that we have multiple front and back end web servers. So this means that our upgrade is a two-step process. Once the upgrade is done to all of the servers you additionally need to upgrade the database.
    • Identification: In CRM, go to Options > About to see the version. If the versions do not match then this could be the cause.
    • Resolution: Open the Deployment Manager and see "Update Available". Perform this update.
    • Takeaway: Ensure your server architecture is documented so you can identify where issues like this could exist (example your Development instance might all be on one server but production is broken out).

As I said, most of our upgrade went very smoothly. These issues were mainly invisible to the end users and we were able to resolve quickly.

Has anyone else done a similar upgrade? Have you seen the same issues? Or different ones I should be on the lookout for?

Monday, May 21, 2018

Microsoft Dynamics 365: How to Set Up Your Free Trial

As you get ready for UG Focus this week you should set up your CRM Trial. This is a great way to play with the new tools and features you are learning. However it can be a little bit confusing when you first create a trial so let's walk through it step by step.

Where to Go
Start at the Dynamics Trial Site. This has you put in your email to get started. If you do not have a "work email" (it will stop you if you try to use @gmail) there is a separate Developer Trial Site. This will not validate the email so it is very helpful if you do not have a work email currently or if your work already uses Office 365 / Dynamics Online.

Fill in your details and click next. You can use whatever Organization Name you like just don't go too crazy as this will be part of your CRM URL.

You will have to include a real phone number to verify your account before it's created.

Save This Info
As your trial is created it will take you to a page of information to save. This includes the Office Portal Link and the username you just created (also don't forget your password!). I would also recommend you save the actual address of the trial site once this is created. It is much easier to go right there and login then navigate through Office 365.

Record your details and then click Set up.

Important Details

I Want it All!
Choose which pieces you want to include in your trail. You can pick all or nothing or anything in between.

Almost there
Choose your options. Click "Complete Set up" and wait patiently.

You did it!
Now you are in your trial! This includes any modules you requested and even sample data to play with. Save this URL for future use, it should look something like this: https://<YourOrgName>.crm.dynamics.com/main.aspx (at least as of May 2018).

You can navigate to this link directly and login with your credentials or access through Office 365.

Ready to use!


Opening From Office 365
If you lose your direct link or want to look at some of the administration features in Office 365, here is how you do it:


  1. login at Portal.Office.com (Remember from the information to remember page)
  2. This will show you the list of apps you have, click on "Dynamics 365"
  3. Be confused for a moment because you are not yet in your trial. Do not click "Take a Quick Tour" even though it is tempting, front-and-center box.
  4. Click on one of the Apps listed (see screenshot)
  5. You are in your trial!

  
Click on one of "Your Apps" to access the Trial

Adding Additional Users
Add Users
More than one person can use your trial. If you are not used to using CRM Online, it might surprise you to know that users need to be created from Office 365 not inside of CRM. To do that:

  1. Navigate to Portal.Office.com and login (or go back to that tab from our last adventure)
  2. Select the "Admin" app
  3. Under the Active Users area select "Add a User"
  4. Enter in the user details and choose which licenses you want them to have (i.e. Make sure "Dynamics 365" is turned on so they can login to your trial)
  5. Send out the username and password you created to your new users!

I hope this helps! Good luck on your Dynamics 365 journey!

Friday, May 18, 2018

Microsoft Dynamics 365 Workflows: Panel Discussion Series

Next week, I will be presenting at CRMUG Focus in Indianapolis on Workflows! To get prepared for this I have been reviewing the webinar Panel Discussion Series: Getting Started with Workflows. This was a great session where Malcolm McAuley hosted with a panel of  Abraham Saldana, Gus Gonzalez, and myself. This is a quick session of the best tips when getting starting creating workflows.

The session started with each panelist sharing their top tips. Abe discussed the importance of using synchronous workflows, only make a workflow Real-time if absolutely necessary. I talked about the need to map out all your logic first and test your workflows in a development environment (or if necessary using User Scope or run on demand). Gus shared the importance of using child workflows as well as how you should always start with a check condition (even when you think you don't need one).

The topic of Child Workflows came up several times on the workflow. Some of the benefits are:

  • Break up large workflows into manageable chunks
  • If the workflow needs to be edited, you can deactivate the child to make the edits and the parent will still fire. The parent will wait for the child to be active and then keep running. If this was just one workflow, anything that should have triggered the workflow would not while it was inactive.
  • If there is a wait in your workflow, you want to separate the logic after the wait into a child so that you can always use the most recent logic. (See more on this in my Workflow Settings blog)
Malcom asked the group what was one of the first "gotchas" when working with workflows. Both Gus and Abe mentioned previous limitations with performance and issues with real time workflows (reminder: use only when necessary). Additionally Abe talked about being careful with Wait conditions in your workflows and being aware of other options outside of workflows. I also mentioned the need to review your security. Don't just trust out of the box security roles! Some people may have access to create workflows that you would prefer did not.

We also spent some time discussing workflow documentation. Each of us use different tools (Excel, Visio, OneNote) to capture the details. The theme was to make documentation a priority and if possible, start at the beginning. Create your documentation when you start then you can just add to it instead of needing large-scale documentation efforts.

I would also recommend using Advanced Find to review your processes. This allows you to pull in details like if it runs on demand, on create, trigger fields, etc. This is a good place to start with your documentation. Then you can also navigate to specific fields and "Show Dependencies" to see which workflows they are included in. I use this when changing the Display Name for a field, then you can see which workflows might need updated wording too.

Finally, Gus mentioned how extensible workflows are. There are Actions which can be built once and available to use with any entity and there are Custom Workflows. There are several Custom Workflow solutions available for free (Ultimate Workflow Toolkit, Workflow Elements) or, like Abe, you can write your own and use on future projects.

Workflows are a very powerful tool and can greatly streamline your system! Just be careful and learn from these tips so you can build the best processes possible.

How do you use workflow? Any other tips to share?

If you liked these tips make sure you watch the full recording and check out the other Webinar Recordings on CRMUG!

Thursday, May 17, 2018

Microsoft Dynamics 365 Tools: Level Up Extension

Accessing Level Up
I don't want to spoil the upcoming Panel Discussion Series: What's your Favorite Tool (or if you missed it look at Webinar Recordings) but I want to talk a bit about the Level Up Chrome Extension!

How to Install

Menu when on a List view
Open up Chrome and go to the Level Up Chrome Extension. Add to Chrome.

How to Use

Now whenever you are using CRM, you will see a little rocket light up on your tool bar ribbon. Click this to expand and see all the things you can do. You will notice that the features available are different when you are in a list of records versus within a particular record. I will talk about a few of my favorite features.

God Mode

God Mode allows you to bypass any requirements of the form. It will set all fields to not-required and make all read-only fields editable. This allows you to do some data changes that you might want to prevent users from doing.

Note: There is nothing about this tool that is restricted to administrators. So this is something you do not want to share with your users because it gives them way more power than is necessary.
Menu when on a record

Show Logical Names

When looking at a particular record, you can click "Logical Names". This will show the schema name next to the field on the form. This allows you to quickly grab this data or grab a screenshot of the section you are working with.

I find this particularly helpful when working with our developers or data team. They know where they see the field but need to know how to find it in the database and I can provide this data in just a few clicks.

When done, you can click "Clear Logical Names" and get back to working.
Show Logical Names

Show Option Set Values

Similarly to viewing the Logical Names, you can view the "Show Optionset Values". This will show all drop downs with their numeric value next to the text label. This is super helpful to grab these values quickly instead of clicking through each one in the field properties.
Show Option Set Values

In addition to these features you can do things like grabbing the link to a record or copying the GUID of the record. Lots of great time saving items.

Have you used Level Up in your implementation? What's your favorite feature?

Tuesday, May 15, 2018

Advanced Find Tip: Using the Wildcard

Hopefully you are already aware of the power of using the wildcard in Dynamics 365 searches. This allows you to use a * to represent any number of characters. So if you do not know what a name starts with you could search for "*smith" and get results for all records that contain "smith" not just start with it. Similar to a "contains" search in Advanced Find. 

However, you may have turned on Full Text searching. When using Full Text Searching, all of your searches are like wildcard searches (but a bit better) so you can quickly forget about the power of the wildcard.

But wait - you can use the wildcard in Advanced Find! Of course, you would not want to use it in the case above ("*smith") because you could use a contains search. Think of instead an example where you knew some of the characters at the beginning (but not the first characters) and some towards the end. How could you accomplish this in Advanced Find?

I used this recently when searching for Notes. The Notes in question contained a timestamp in the format of 00:00:00 which was different from other notes (that I wanted to exclude) with a format of 00:00. I wanted to return the Notes that had included the seconds value in the Note title.

To find this I can search for Notes where the Title contains "*:*:*"! This found the notes I was looking for perfectly!

Also Pro Tip: Try to narrow down your Advanced Finds as much as possible especially when dealing with entities with a large volume of records. In this case, I knew the notes I was looking for were all created after a certain date so I could use that to shrink the universe of records I was searching before heading to the results.

How do you use the *Wildcard*?


Monday, May 14, 2018

Microsoft Dynamics 365 Solutions: Intro and Panel Discussion

If you missed this webinar a few weeks ago it is time to watch the recording!

CRM Solution Management Introduction and Panel Discussion

In this 1 hour webinar Patrick Wright (Richmond, VA Chapter Leader), Todd Mercer (Ottawa, Ontario, Canada Chapter Leader), Aiden Kaskela (Reston, VA Chapter Leader and MVP) and myself (Washington, DC Chapter Leader) talk about everything you need to know to get started with solutions.

Patrick kicks us off explaining what a solution is and a bit about the difference between managed and unmanaged.

Then I explain what you can add to a solution and how to do that.

Todd educates us on change management and the steps to export your solution from one environment and import it into another.

Finally, Aiden goes deeper into the Managed vs Unmanaged discussion and provides some scenarios to consider.

We spent the rest of the time answer questions from the audience and sharing our tips. I hope this is beneficial for you. What other solution questions do you still have?

Friday, May 11, 2018

Upcoming events for Microsoft Dynamics 365 Users in Washington, DC

It's time to talk more about the awesome Microsoft Dynamics CRM Community in the Washington, DC area! There are several great chapters in the DMV and there are great meetings coming up next week.


The week after is CRMUG Focus in Indianapolis! If you plan to attend, we will also have a dinner meetup to network with other local attendees.  

Learn more and RSVP here: DMV Chapter Focus Meetup 

To make Focus even more exciting, several of your DMV Chapter leadership teams will be presenting, make sure to add these sessions to your schedule: 

  • Wednesday May 23 8:30 AM – Workflows: Flexing your Administrator Muscles! - Kylie Kiser, DC Chapter Leader 
  • Thursday May 24 3:00 PM – Building Dynamics 365 Bots with Azure Bot Framework and LUIS – Michael Ochs, DC Chapter Team; Aiden Kaskela, Reston Chapter Team  

Then later on in the summer we will be having a Summer Social at a National's baseball game. Details are still being finalized, so register and watch the community for updates: CRMUG Washington DC Summer Social 

Finally, we are also having a Regional Chapter Meeting in August. This will have attendees from the DC, Reston and Richmond chapters. The full day event will feature many great speakers and great networking. Save the Date for August 15!

I hope to see you at some of these events!

Wednesday, March 28, 2018

Microsoft Dynamics 365 Business Rule Steps

Business Rules in Microsoft Dynamics 365 are a very powerful tool. They allow administrators to create the effects of form scripting without needing to know JavaScript (or as it is usually in my case, educated copy and paste :) ). So let's talk about what can be done with Business Rules.

Getting Started

Business Rules are created within a particular entity or can be done from within the form. When creating you can choose the scope of the business rule to be: Entity, All forms, or a specific form. Entity means this rule will be applied from all data entry points (forms, imports, API, etc.). All forms will mean that whenever data entry is occurring from the form these rules will be applied. If you choose a specific form then the rule will only apply when that form is used.

Components

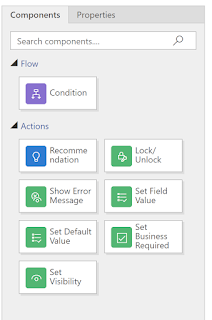
Here are the steps that can be done via Business Rules:

  • Condition: If statement. Allows you to specify when the next actions should occur. You can have multiple conditions one after each other but you cannot put a condition after another type of step.
  • Recommendation: New in 8.2 and example to follow. This allows you to notify users of a recommended change. It does not force them to make the change but shows the expected change and can apply it for the user.
  • Show Error Message: Present an error message to the user. While error message is onscreen the user cannot save changes. So make sure this message explains what to do to fix.
  • Set Default Value: Set the value for any field from that entity. Change is made on-screen for the user. This can be set to a specific value or to the value of another field.
  • Set Field Value: Set the value for any field from that entity. Change is made on-screen for the user. This can be set to a specific value or to the value of another field or the field value can be cleared. So that is similar to Set Default Value and the difference depends on when you expect this action to occur (see this blog from PowerObjects to clarify).
  • Set Visibility: Show or hide fields on the screen. If you hide all fields in a section, the whole section will be hidden.
  • Lock/Unlock: Set fields to read-only or back to editable.
  • Set Business Required: Change field requirement level between Business Required and Not Required. Great to use when you want to make sure fields are required based on a specific type or category.
Recommendations

The Recommendation functionality is very interesting as it allows you to encourage the users to do something without forcing the change. So exceptions can still be allowed.

In your business rule you will choose the Condition when this recommendation will apply as well as the message details to display to the user and the change you want to occur.


Then when that condition is met an idea icon shows up next to the field the Recommendation is on.


If users click this icon, they will see your defined message.


Then they can choose to "Apply" your recommendation and make the change automatically. Or they can click "Dismiss" to ignore your suggestions.


This Recommendation functionality has lots of potential uses and can be used in combination with other Business Rule steps.

How do you use Business Rules? Any cool solutions?

Tuesday, March 27, 2018

Scribe Online Documentation Tool

If you use Scribe Online with Microsoft Dynamics 365 (or any system really) you need to check out their Google Docs Documentation tool. Start with this article on how to use: https://dev.scribesoft.com/en/g_docs/doc_maps.htm

From inside a Google sheet, you will login to Scribe Online and then it will magically pull down the details of your integration. This will include all of the steps with any queries, steps, field maps, etc.

This has saved me so much time since I learned about it. No more (or at least less) time spent detailing everything the integration is doing, just look like you worked really hard on it. Then take yourself out for coffee.

Solution overview

Step Details

Saturday, March 24, 2018

Getting Started with XrmToolBox

XrmToolBox is a great tool for administrators. It has lots of great features to make your life easier. For me, it was a bit intimidating getting started so let's talk about how to do it. Then I will talk about a few of my favorite tools.

Step 1: Download the tool

Download the latest version from: https://www.xrmtoolbox.com/
This will download a .zip file. Extract to anywhere convenient on your machine.

Step 2: Launch the App

Open the extracted files. It will looks something like this. Double click on the Application to launch. This does not need to be on the CRM Server or installed. Just launch.


Loading. Wait patiently.


Step 3: Install Additional Plugins

Don't be crazy we are just getting started! You can close this page.
Later you can use this step to add additional tools that are not downloaded by default. You can also launch this once in the app through Tools -> Plugin store.
But for now, just stay calm and close this window.


Step 4: Set up your Connection


Now you will link to your CRM implementation. You can store multiple connections (such as a development environment and production). Remember to test everything in a development environment. If possible, use the tool to make changes there then use a solution to move to other environments. But that's a topic for another time.

  1. Click the "Connect" Button in the top left
  2. Select "New Connection" in the new window
  3. Enter the URL for your CRM instance. If you are on-premise, then you can check off "Use your current credentials" to login with your domain login. Click "Go" to proceed.
  4. If online, then enter your username and password to login. You can also select "Save password to encrypt string in connection file" so you do not need to enter your credentials again in the future.
  5. Wait patiently.
  6. Enter a name for this connection. This should be something that will help you know which environment it connects to.
  7. You will notice the bottom of the screen updates to show the connection.
Step 5: Start working!

Now, just go to the Plugins tab and start seeing what magic you can do!


Metadata Document Generator

This is one of my favorite tools as it saves me from typing and copying things unnecessarily! It allows you to grab all of the attributes and their details from all entities in your CRM system.

To use start by selecting "Retrieve Entities and Languages" to pull in the data from your CRM system. Then select an Excel file to populate with this data (blank, everything will be overwritten). Select the entities you want to extract the data from or all entities. Finally, click "Generate Document".


The Metadata Document Generator is the tool I have used the most frequently. There are lots of other great tools to check out such as:
  • Audit Center - Allows you to modify the audit settings of fields in bulk. Good idea when you enable auditing for an entity and all fields have been automatically enabled.
  • Easy Translator - designed to help you set the field labels in other languages. Also can be used for updating the description fields (aka tool tips) in bulk. (We used this when upgrading from 2011 to 2016 because many fields had descriptions saying "Created by KK on ...")
  • User Settings Utility - update default user settings such as number of records in a view and default start page.
  • View Layout Replicator - Allows you to copy the columns plus widths from one view to another. It even allows you to copy from a personal view to a system view. This is great when creating a new entity where you want all views to be consistent but you don't want to do all the clicking multiple times. 
That's all! Try it out and see what you can do!

What are your favorite uses for XrmToolBox?

Monday, March 19, 2018

Microsoft Dynamics 365 Workflows: Real Time Options

Creating a new Real-Time Workflow
I have been mentioning Real-Time workflows throughout the rest of my workflow series. Today, let's look at Real-Time workflows specifically.
Converting to Real Time from Background

Start When Options
 Converting to Real-Time


Return Error to User: Step 1
New Workflows are set to Run in the Background (asynchronous) by default. You can un-check this option when creating a new workflow or to change an existing workflow to a Real-Time workflow, click the "Convert to Real-Time Workflow" button in the Ribbon.

This button will then change to allow you to convert back to a background process if necessary.

Remember to use Real-Time workflows sparingly as these can impact the performance for the end user.
Return Error to User: Step 2

Start When Options

Real Time Delete Example Workflow
The Start options are different for Real-Time workflows because you can choose if the steps run before or after an action occurs.
Real Time Delete Example Message


Real Time Delete Returned Message

For example, you could configure it to run Before a delete occurs and use the workflow to prevent the deletion in certain situations.

The same scope and start when types apply.

Run As Options

A background workflow will always run as the workflow owner. For Real-Time workflows you can choose if it will run as the workflow owner or the user who triggers the workflow (meaning the person who created the record if running on create).

Be sure to test this setting with your end users and review the security needed to complete the tasks. If running as the triggering user and the end user does not have permission to complete the tasks in the workflow then the workflow will fail.

Returning Errors to the User

A cool feature of Real-Time workflows is that you can use them to prevent actions and return messages to the user. Let's say we want to do this in a delete scenario:

  1. Create your workflow to fire BEFORE Delete
  2. Add a Conditional Statement to the workflow, say if Opportunity: Estimated Revenue is over $100,000
  3. Add a step to Stop Workflow as Canceled
  4. Click Properties and you can fill in the message returned to the user

The properties also allows you to pull in dynamic fields. So you can say in the Alert that the delete was prevented due to the estimated revenue being over a certain amount. This same logic could be used to prevent closing an opportunity as lost without manager approval or deactivating an account without reaching out.

How have you used Real-Time Workflows? What is your favorite feature?