Wednesday, March 28, 2018

Microsoft Dynamics 365 Business Rule Steps

Business Rules in Microsoft Dynamics 365 are a very powerful tool. They allow administrators to create the effects of form scripting without needing to know JavaScript (or as it is usually in my case, educated copy and paste :) ). So let's talk about what can be done with Business Rules.

Getting Started

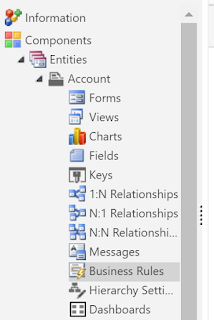
Business Rules are created within a particular entity or can be done from within the form. When creating you can choose the scope of the business rule to be: Entity, All forms, or a specific form. Entity means this rule will be applied from all data entry points (forms, imports, API, etc.). All forms will mean that whenever data entry is occurring from the form these rules will be applied. If you choose a specific form then the rule will only apply when that form is used.

Components

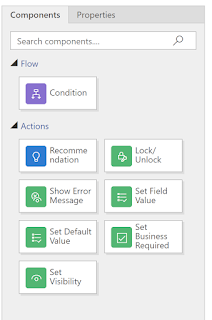
Here are the steps that can be done via Business Rules:

  • Condition: If statement. Allows you to specify when the next actions should occur. You can have multiple conditions one after each other but you cannot put a condition after another type of step.
  • Recommendation: New in 8.2 and example to follow. This allows you to notify users of a recommended change. It does not force them to make the change but shows the expected change and can apply it for the user.
  • Show Error Message: Present an error message to the user. While error message is onscreen the user cannot save changes. So make sure this message explains what to do to fix.
  • Set Default Value: Set the value for any field from that entity. Change is made on-screen for the user. This can be set to a specific value or to the value of another field.
  • Set Field Value: Set the value for any field from that entity. Change is made on-screen for the user. This can be set to a specific value or to the value of another field or the field value can be cleared. So that is similar to Set Default Value and the difference depends on when you expect this action to occur (see this blog from PowerObjects to clarify).
  • Set Visibility: Show or hide fields on the screen. If you hide all fields in a section, the whole section will be hidden.
  • Lock/Unlock: Set fields to read-only or back to editable.
  • Set Business Required: Change field requirement level between Business Required and Not Required. Great to use when you want to make sure fields are required based on a specific type or category.
Recommendations

The Recommendation functionality is very interesting as it allows you to encourage the users to do something without forcing the change. So exceptions can still be allowed.

In your business rule you will choose the Condition when this recommendation will apply as well as the message details to display to the user and the change you want to occur.


Then when that condition is met an idea icon shows up next to the field the Recommendation is on.


If users click this icon, they will see your defined message.


Then they can choose to "Apply" your recommendation and make the change automatically. Or they can click "Dismiss" to ignore your suggestions.


This Recommendation functionality has lots of potential uses and can be used in combination with other Business Rule steps.

How do you use Business Rules? Any cool solutions?

Tuesday, March 27, 2018

Scribe Online Documentation Tool

If you use Scribe Online with Microsoft Dynamics 365 (or any system really) you need to check out their Google Docs Documentation tool. Start with this article on how to use: https://dev.scribesoft.com/en/g_docs/doc_maps.htm

From inside a Google sheet, you will login to Scribe Online and then it will magically pull down the details of your integration. This will include all of the steps with any queries, steps, field maps, etc.

This has saved me so much time since I learned about it. No more (or at least less) time spent detailing everything the integration is doing, just look like you worked really hard on it. Then take yourself out for coffee.

Solution overview

Step Details

Saturday, March 24, 2018

Getting Started with XrmToolBox

XrmToolBox is a great tool for administrators. It has lots of great features to make your life easier. For me, it was a bit intimidating getting started so let's talk about how to do it. Then I will talk about a few of my favorite tools.

Step 1: Download the tool

Download the latest version from: https://www.xrmtoolbox.com/
This will download a .zip file. Extract to anywhere convenient on your machine.

Step 2: Launch the App

Open the extracted files. It will looks something like this. Double click on the Application to launch. This does not need to be on the CRM Server or installed. Just launch.


Loading. Wait patiently.


Step 3: Install Additional Plugins

Don't be crazy we are just getting started! You can close this page.
Later you can use this step to add additional tools that are not downloaded by default. You can also launch this once in the app through Tools -> Plugin store.
But for now, just stay calm and close this window.


Step 4: Set up your Connection


Now you will link to your CRM implementation. You can store multiple connections (such as a development environment and production). Remember to test everything in a development environment. If possible, use the tool to make changes there then use a solution to move to other environments. But that's a topic for another time.

  1. Click the "Connect" Button in the top left
  2. Select "New Connection" in the new window
  3. Enter the URL for your CRM instance. If you are on-premise, then you can check off "Use your current credentials" to login with your domain login. Click "Go" to proceed.
  4. If online, then enter your username and password to login. You can also select "Save password to encrypt string in connection file" so you do not need to enter your credentials again in the future.
  5. Wait patiently.
  6. Enter a name for this connection. This should be something that will help you know which environment it connects to.
  7. You will notice the bottom of the screen updates to show the connection.
Step 5: Start working!

Now, just go to the Plugins tab and start seeing what magic you can do!


Metadata Document Generator

This is one of my favorite tools as it saves me from typing and copying things unnecessarily! It allows you to grab all of the attributes and their details from all entities in your CRM system.

To use start by selecting "Retrieve Entities and Languages" to pull in the data from your CRM system. Then select an Excel file to populate with this data (blank, everything will be overwritten). Select the entities you want to extract the data from or all entities. Finally, click "Generate Document".


The Metadata Document Generator is the tool I have used the most frequently. There are lots of other great tools to check out such as:
  • Audit Center - Allows you to modify the audit settings of fields in bulk. Good idea when you enable auditing for an entity and all fields have been automatically enabled.
  • Easy Translator - designed to help you set the field labels in other languages. Also can be used for updating the description fields (aka tool tips) in bulk. (We used this when upgrading from 2011 to 2016 because many fields had descriptions saying "Created by KK on ...")
  • User Settings Utility - update default user settings such as number of records in a view and default start page.
  • View Layout Replicator - Allows you to copy the columns plus widths from one view to another. It even allows you to copy from a personal view to a system view. This is great when creating a new entity where you want all views to be consistent but you don't want to do all the clicking multiple times. 
That's all! Try it out and see what you can do!

What are your favorite uses for XrmToolBox?

Monday, March 19, 2018

Microsoft Dynamics 365 Workflows: Real Time Options

Creating a new Real-Time Workflow
I have been mentioning Real-Time workflows throughout the rest of my workflow series. Today, let's look at Real-Time workflows specifically.
Converting to Real Time from Background

Start When Options
 Converting to Real-Time


Return Error to User: Step 1
New Workflows are set to Run in the Background (asynchronous) by default. You can un-check this option when creating a new workflow or to change an existing workflow to a Real-Time workflow, click the "Convert to Real-Time Workflow" button in the Ribbon.

This button will then change to allow you to convert back to a background process if necessary.

Remember to use Real-Time workflows sparingly as these can impact the performance for the end user.
Return Error to User: Step 2

Start When Options

Real Time Delete Example Workflow
The Start options are different for Real-Time workflows because you can choose if the steps run before or after an action occurs.
Real Time Delete Example Message


Real Time Delete Returned Message

For example, you could configure it to run Before a delete occurs and use the workflow to prevent the deletion in certain situations.

The same scope and start when types apply.

Run As Options

A background workflow will always run as the workflow owner. For Real-Time workflows you can choose if it will run as the workflow owner or the user who triggers the workflow (meaning the person who created the record if running on create).

Be sure to test this setting with your end users and review the security needed to complete the tasks. If running as the triggering user and the end user does not have permission to complete the tasks in the workflow then the workflow will fail.

Returning Errors to the User

A cool feature of Real-Time workflows is that you can use them to prevent actions and return messages to the user. Let's say we want to do this in a delete scenario:

  1. Create your workflow to fire BEFORE Delete
  2. Add a Conditional Statement to the workflow, say if Opportunity: Estimated Revenue is over $100,000
  3. Add a step to Stop Workflow as Canceled
  4. Click Properties and you can fill in the message returned to the user

The properties also allows you to pull in dynamic fields. So you can say in the Alert that the delete was prevented due to the estimated revenue being over a certain amount. This same logic could be used to prevent closing an opportunity as lost without manager approval or deactivating an account without reaching out.

How have you used Real-Time Workflows? What is your favorite feature?